Why Your PCB Fails Despite Using the Manufacturer’s Schematic

You’ve followed the schematic provided by the chip manufacturer, but your PCB still has issues. It may be unstable, not hitting performance targets, or failing EMC tests. Is it human error, or a bad batch of ICs? If you’re struggling with these problems, it’s time to revisit your PCB design.

#image_title
The Trouble with DC-DC Power Circuits
DC-DC power circuits can be challenging due to their high-frequency, high-current operation. Although 500kHz might not sound like “high frequency,” square wave signals are full of harmonics, meaning there’s plenty of high-frequency interference to manage.
High-frequency, high-current systems produce strong electromagnetic interference (EMI) that affects both external circuits and the system itself. The performance of your DC-DC converter depends heavily on PCB layout, wiring, and grounding. If not planned from the start, fixing issues later can be difficult and costly.
Datasheets for DC-DC chips often provide detailed principles, application examples, and layout guidelines. But did you read them thoroughly and apply their suggestions? For instance, the TPS5430 datasheet suggests:
- Place the input capacitor as close as possible to the Vin pin.
- Keep the inductor near the PH pin.
- Position components like the flyback diode and startup capacitor close to the IC.
- Minimize the loop from the PH pin to the inductor, output capacitor, and ground.
- Keep the output voltage sampling components away from the PH node.
- Properly connect the GND pin to the ground plane.
- Use a copper fill to connect the IC’s thermal pad to the ground plane.
- Add vias at the ground terminals of the input and output capacitors.
Even with these detailed instructions, practical challenges arise during PCB layout. Variations in component size, board shape, and surrounding circuits can influence the design. Sometimes, there’s too much information to process, or people simply rely on past experience instead of consulting the datasheet.
Understanding the Principles Behind Design Guidelines
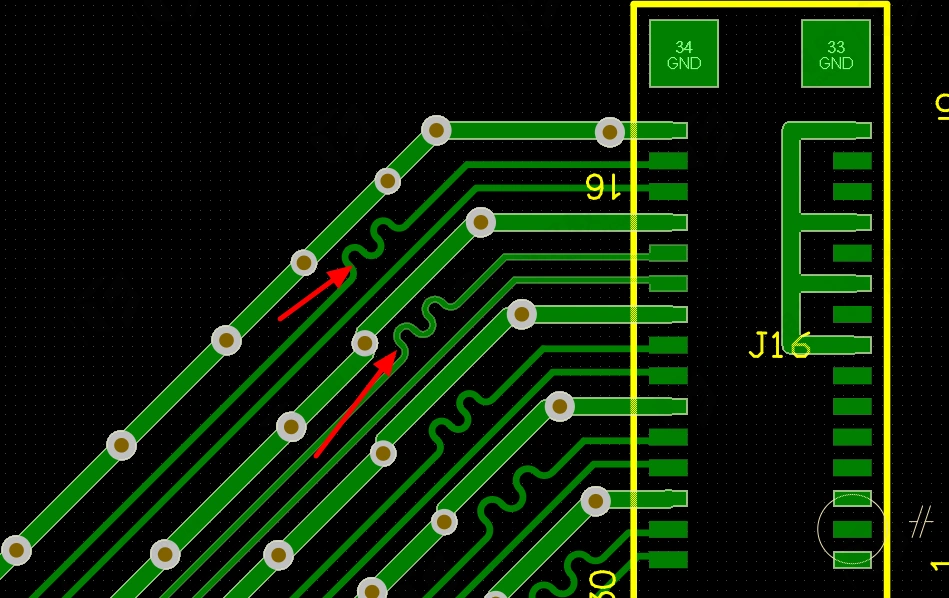
Blindly following design recommendations without understanding their purpose is risky. You need to understand why each step is essential. Conductors form loops, and these loops can act as antennas, transmitting and receiving electromagnetic waves, which cause interference.

#image_title
The strength of this interference depends on the loop area, current, frequency, and distance. To minimize EMI, the primary goal is to reduce the loop area of the key current loops in the PCB design, paying attention to both forward and return current paths.

#image_title
Return Path and Ground Plane in PCB Design
In PCBs, the return path is typically formed by the ground plane. A well-designed ground plane minimizes impedance in the return path, reducing noise and EMI. In buck and boost converters, the key current loops control EMI.
In a buck converter, there are two main current loops: one when the switch (M1) is on (red loop) and one when it’s off (blue loop). The current through the MOSFET and flyback diode fluctuates rapidly, generating EMI, while the inductor current is smoother. The on-state current loop is the primary source of high-frequency radiation due to its sharp changes.

#image_title
BUCK and BOOST Sensitive Circuits
Since loops can act as both transmitting and receiving antennas, high-impedance sensitive circuits are prone to antenna interference. These circuits should be isolated and grounded separately, while also minimizing their loop area. In DC-DC power circuits, these sensitive circuits often include voltage and current sampling circuits, soft-start, and other auxiliary circuits.
Methods to Reduce Critical Current Loops
It’s important to note that current loops may take on a three-dimensional geometric shape. In addition to keeping components in the loop close together, the return path must also match the forward path as closely as possible. For instance, a loop antenna compressed into a vertical line ceases to function as an antenna. This is why we twist wires together to eliminate coupling noise.

#image_title
The return path impedance should be minimized. Just as water flows downhill and stock prices move along the path of least resistance, current flows along the path of least impedance in the ground plane. If the ground plane were infinite, the return current would automatically concentrate directly below the forward current. This natural behavior creates the path of least impedance for the return current. We must remember this key point when designing return paths for current signals.

#image_title

#image_title
First, the ground plane should be large, and the power distribution lines for high-current circuits should also be wide. The top and bottom layers should be covered with copper to form the ground plane. At key points, place enough vias based on the size of the current to connect to the ground plane. Sensitive circuit parts should be grounded separately, then connected to the ground plane at the GND pin of the chip.

#image_title
Example 1: TPS61088 Boost Converter
The TPS61088 synchronous boost converter has most of its key current loop inside the chip, so you only need to focus on the output capacitor. In a two-layer PCB design, most components and traces should be on the top layer, while the bottom layer serves as a solid ground plane.

#image_title
In the image below, the red section shows the external key current loop of the chip, with a small capacitor placed very close to it, minimizing the loop area. The blue section shows the secondary current loop, with the inductor and output capacitor placed on the left of the chip. Large copper fills are used for PGND, connected to the bottom layer ground plane with multiple vias.

#image_title
The key takeaway here is that even a small change in the loop area, such as adding a tiny SMD capacitor, can significantly increase SW output ringing.
The TPS61088, packaged in VQFN, allows for a smaller loop area than TSSOP packages. Its large exposed thermal pad on the bottom helps with heat dissipation, and you can use multiple thermal vias to connect it to the bottom layer for improved thermal performance.

#image_title

#image_title
Example 2: LM3150 Buck Converter
The LM3150, a TI synchronous buck converter with external MOSFETs, provides a great example of efficient layout on its evaluation board. The critical current loop consists of C1n1, C1n2, and C1n3. This PCB design uses a four-layer board to reduce EMI significantly, especially if EMC is a concern.

#image_title

#image_title
Below is a comparison between a two-layer and a four-layer board under the same conditions. The four-layer board shows at least a 10 dBμV/m improvement in EMC test results.

#image_title
In the PCB image, note the tightly arranged key current loop, with minimal loop area. The input and output power lines are wide copper fills. The middle section, PGND, is where most noise originates. Sensitive circuits are grounded separately and placed far from the noise sources.

#image_title
Key Takeaway: Handle Current Loops with Care
Understanding current loop design helps minimize EMI and improve performance. For double-layer PCBs, the bottom should be a solid ground plane, with sufficient vias to connect the top layer traces to ground. Sensitive circuits should have their own ground plane, connected to the main ground via multiple vias.
By carefully managing current loops and following sound PCB design principles, you can drastically reduce interference and ensure your design meets performance and EMC requirements.
Table of Contents

Related Posts

PCBA Prototype
July 21, 2026
PCBA Prototype
July 17, 2026